
 https://doi.org/10.46430/phen0135
Contents
- Introduction
- Method 1: Minimal Level-0 on GitHub.com
- Method 2: IIIF Workbench in GitHub.com
- Method 3: libvips and GitHub.com
- Creating Manifests
- Storing and Hosting Manifests
- Using Your Manifests
- Conclusion
- Endnotes
Introduction
Lesson Goals
The International Image Interoperability Framework (IIIF) provides a standardized way to publish, display, share, and reuse images across different websites, tools, and viewers. This lesson demonstrates how to make high-quality, zoomable, shareable, interoperable images through the International Image Interoperability Framework (IIIF). It provides three methods for creating basic IIIF-compliant images, and creating and hosting IIIF manifests of images downloaded to your local device. In particular, you will learn:
- How to create Level-0 (basic) compliant IIIF images
- How to create a IIIF manifest to present Level-0 compliant IIIF images
- How to host IIIF manifests on GitHub
Prerequisites
There are no fees for processing or hosting through any of these methods, and all of the tools and applications used in these methods are open-source. However, in order to follow this lesson, you will need:
- An active GitHub account. Some basic familiarity with GitHub, such as creating and navigating repositories, will also be helpful.
- At least one image downloaded to your local computer, not copyrighted by someone else. You can use Openverse, the successor to Creative Commons’ CC Search, to find suitable images.
- A strong Internet connection.
- Method 3 (using
libvips) requires additional installations as directed.
Note that this lesson is designed for users on macOS. Users on Windows or Linux devices can follow documentation for using comparable built-in file management systems (such as File Explorer on Windows and device-dependent on Linux). Alternatively, you can use command-line interfaces (such as PowerShell on Windows or Bash on Linux) to adapt the methods, but options for adaptation will not be covered in detail.
Each of these methods make use of the tools and workflows created by IIIF Technical Coordinator Glen Robson. Methods become progressively harder and more intensive as you go through this lesson.
What is IIIF?
The International Image Interoperability Framework (IIIF) describes itself as ‘a set of open standards for delivering high-quality, attributed digital objects online at scale’1. In plain terms, IIIF is a standardized format for delivering digital objects, such as images, videos, and even 3D models, from one place on the web to another. The framework allows cultural heritage institutions, project teams, and individuals to share high-resolution digital objects across the web quickly, easily, and in a way that speaks between and across different systems.
Effectively, IIIF standardizes the way images are delivered by servers to platforms, tools, and environments on the web using a series of Application Programming Interfaces (APIs) that allow two different computers or pieces of software to communicate with one another. IIIF has both an Image API and a Presentation API: the Image API tells an image server how, what size, and what part of an image to serve, while the Presentation API tells the image viewer how, in what order, with what description, etc. to display the image. Because IIIF’s Image API specifies exactly how an image’s pixels will be served to a viewer or user, it’s easy to specify exactly how much, and in what way, you want the image to be displayed. To learn more on how IIIF works, you can explore IIIF’s How It Works guide.
What is Level-0 Compliance?
Image servers can be compliant at different levels, with varying parameters needed to make them work with the IIIF Image API. In this lesson, all of the images you produce will be Level-0 compliant, meaning that they will not require a specialized image server at all. Level-0 compliance allows you to use pre-built files, instead of processing, modifying, and rendering image files on the spot through an image server. Instead, all of the images in this lesson will be static, served through a standard web server via GitHub Pages. Images at Level-0 compliance can be tiled or untiled: tiled images are made up of lots of files, each containing a portion of the image, while untiled images are one single image file. For more on compliance, refer to the IIIF’s Image API Compliance, Version 3.0.0 documentation.
What is a IIIF Manifest?
An International Image Interoperability Framework manifest is a file that contains all the information about an image or group of images served using IIIF, including the metadata, order of presentation, and size specifications. Creating manifests for your images means that you can specify metadata that will display when viewed in a IIIF-compatible viewer. There are also tools, digital exhibition platforms, and viewers that only accept manifests, not images, so knowing how to create compliant images and manifests is important for effectively leveraging IIIF.
IIIF manifests rely on Uniform Resource Identifiers (URIs) to identify and access IIIF-compliant images on the web and display them using the IIIF Presentation API. There are two uniform identifiers that can be used to create manifests: the info.json URI and the image URI.
-
The
info.jsonURI requests information about the image service, that is, how the image is being served to the web. Theinfo.jsonURI will include the path to theinfo.jsonfile for that image in your GitHub repository:https://YOUR-GITHUB-USERNAME.github.io/YOUR-REPO-NAME/images/YOUR-IMAGE-FILENAME/info.json. -
The image API URI requests information about the image itself (dimensions, rotation, etc.) as processed by the IIIF Image API. The image API URI will include the path to the folder with the full resolution tiles of your image in your GitHub repository: for example,
https://YOUR-GITHUB-USERNAME.github.io/YOUR-REPO-NAME/images/YOUR-IMAGE-FILENAME/full/full/0/default.IMAGE-FILE-EXTENSIONin version 2 of the IIIF Image API orhttps://YOUR-GITHUB-USERNAME.github.io/YOUR-REPO-NAME/images/YOUR-IMAGE-FILENAME/full/max/0/default.IMAGE-FILE-EXTENSIONfor version 3.
What is the Difference Between IIIF Versions?
The methods demonstrated in this lesson can be applied to both version two (v2) and version three (v3) of the IIIF APIs. Knowing which version you would like to use is important because the two differ in structure, meaning that manifest files for each are read and rendered by servers differently. Version two and three differ both semantically and structurally: each version’s manifests use different labels for properties, such as @id (v2) vs. id (v3), description (v2) vs. summary (v3), and license (v2) vs. rights (v3).
In terms of structure, IIIF v3 manifests are formatted according to the W3C Web Annotation Data Model, an extensible specification that ensures annotations are interoperable across platforms and systems. Annotations, or pieces of media associated with a web resource, are grouped together and ordered using Annotation Pages; each v3 manifest will include an object with the AnnotationPage type with other objects with the Annotation type nested inside.
Using v3 is necessary for users who want to create manifests with rich audio/video content, such as clips, sound recordings, and non-2D media. v3 is also optimized for compatibility with different web resources, given the adoption of the W3C Web Annotation model. Ultimately, v2 is only needed if you intend to use a technology, software, or viewer that only accepts v2 manifests. Otherwise, v3 is recommended. You can see all of the changes made in Version 3.0 in the IIIF Presentation API Version 3.0 Change Log.
What are Manifest Editors?
Manifest editors provide an easy way to visually put a manifest together, directly in your browser. The two most popular manifest editors are The Bodleian’s IIIF Manifest Editor, created by the University of Oxford, and the Digirati IIIF Manifest Editor; both are free and web-based. The Bodleian Manifest Editor is only compliant with IIIF v2, while the Digirati Manifest Editor is compatible with either, but produces v3 manifests by default.
Why Use GitHub?
GitHub is a web-based code storage, sharing, and version control platform built on the version control system Git. GitHub also offers free web-hosting through GitHub Pages, which allows you to create a GitHub-hosted webpage from your code. Using GitHub and GitHub Pages, you can conveniently store, host, and access your IIIF images and manifests in one place on the web.
Using GitHub also allows you to easily switch between methods if your chosen method has been deprecated or the software is no longer supported. For example, the Internet Archive; a popular tool for creating IIIF manifests, have a partnership with IIIF so images uploaded using their public upload feature are automatically IIIF compliant. In September 2024, however, the Internet Archive suspended its services for several months due to cyberattacks. During that time, it became necessary to find an alternate cost-free method of rendering and serving IIIF manifests from personal photos or images found on the web, and most of these open-source solutions are already on GitHub.
GitHub Pages also automatically serves files to the web with permissive Cross-Origin Resource Sharing (CORS) headers, which tell a browser that a web application at one domain is allowed to access resources from another. Without the CORS headers, IIIF images cannot be shared across domains and displayed in third-party IIIF viewers, since the server will not allow access to the files.
Which Method Should I Choose?
Deciding which of these methods to use is dependent on:
- Your comfort and skill level with navigating the command line and using Command Line Interface (CLI) tools.
- Your comfort and skill level with editing JSON files.
- The volume of images you have to process.
- Whether you have particular specifications for how the images process and display.
Method 1 may be best for those with limited/no coding knowledge, limited/no command-line knowledge, and/or those looking for a quick, simple IIIF-compliant solution. Method 1 does not allow for deep zooming or image manipulation (such as rotation and displaying fragments), and is not suitable for displaying large, high-quality image files.
Method 2 may be best for those with limited experience using the command line interface or manipulating JSON files, since the tool it uses has a visual editor that allows you to upload, process, and retrieve images and manifests without any programming skills. Method 2 may also be good for those who do not have particular specifications in terms of quality or the number of image tiles produced, as the tool it uses does not allow for these specifications. Method 2 is also good for those who would like to provide basic deep zooming for their images.
Method 3 may be best for those with moderate knowledge of the command line and who have experience editing JSON files. Method 3 may also be good for those who have particular specifications for their images, as the CLI tool used in this method allows for a series of arguments that can enable highly-controlled resulting images. Method 3 may also be good for batch editing images. If you have never used the command line before, I recommend reading Ian Milligan and James Baker’s Introduction to the Bash Command Line lesson before you begin.
Note that time is not included as a factor for consideration, as all of these methods entail significant processing time.
The following table illustrates the basic pros and cons of each method, with the four factors above in mind:
| Method 1 | Method 2 | Method 3 |
|---|---|---|
| Pros • Visual editor/interface • No programming or command-line knowledge required • No experience editing JSON files required |
Pros • Easy-to-use graphical interface • Some control over image processing and the resulting image or manifest specifications |
Pros • Batch processing and editing (hundreds of images at once) • High level of control over image processing and the resulting image or manifest specifications |
| Cons • No batch processing or editing (images must be uploaded one by one) • No control over image processing or the resulting image • No deep zoom or image display specification |
Cons • Limited control over image processing • Can be buggy • File size restrictions for the tiler to function |
Cons • No visual editor/interface • Requires a strong grasp of the command line • Requires knowledge of editing JSON files |
Method 1: Minimal Level-0 on GitHub.com
Overview
Method 1 employs GitHub Pages to host the simplest possible Level-0 manifest, without the need for an image server or the use of the Image API. This method requires only the image file and minimal info.json file, and does not require any programming knowledge or installations.
The caveat is that this method does not support deep zooming. The image will be displayed as is, without any modifications whatsoever.
Uploading Your Images to the Web
The first step is to upload your image to a web server. For this lesson, you will upload an image to a repository on GitHub.com and serve it through GitHub Pages, where you will also host the manifests later.
Create a new repository on GitHub. Create a new folder for images and another for manifests. In the new repository, click Add file > Upload files. Upload your image files.
To serve the images to the web, go to the repository home and click Settings > Pages. Set the Source to ‘Deploy from a branch’ and the Branch to ‘main /(root)’.
Your image should now be available at https://YOUR-GITHUB-USERNAME.github.io/YOUR-REPO-NAME/images/YOUR-IMAGE-FILENAME.
Find the Identifiers for Your Image
For this method, the identifier for your image is the full URL to your image on the web: https://YOUR-GITHUB-USERNAME.github.io/YOUR-REPO-NAME/images/YOUR-IMAGE-FILENAME. No additional specifications or backslashes are required.
At this stage, you can go to the Creating Manifests section to create manifest files manually or using a manifest editor.
Method 2: IIIF Workbench in GitHub.com
Overview
Method 2 employs the use of IIIF Workbench, a tool created by IIIF Technical Coordinator Glen Robson that allows you to upload an image from your local computer that will then be converted to IIIF tiles and stored in your own version of the IIIF Workbench GitHub repository.
There are, however, caveats with this method that are worth mentioning before you get started:
- IIIF Workbench is slow at breaking down images with the tiler, so it can take a while for images to upload.
- IIIF Workbench sometimes fails to generate tiles for an image — it stalls on ‘Generating tiles’ forever. This is typically because an image has been resized incorrectly, is too big, or is not in an accepted file format.
- IIIF Workbench does not work with organizational GitHub accounts.
- Uploaded files must be under 100 MB. This excludes high-quality TIFFs, unless you resize the TIFFs significantly.
Overall, IIIF Workbench is a great tool that prioritizes ease-of-use and features a clear and simple Graphical User Interface (GUI) to make uploading images accessible, even for those with limited knowledge of programming.
Preparing Your Image Files
Download Your Image(s)
The first step is to download your image to your local computer from any source. Often, online repositories such as Google Images do not offer options for the file format in which you can download an image, but some repositories, such as online museum collections, do. If you have the option, download your image using the optimal file format available. For creating high-quality IIIF-compliant images, Tagged Image File Format (TIFF) is best, Joint Photographic Experts Group (JPEG) is second best, and Portable Network Graphics (PNG) is third best.
If you have multiple images to download, it is best to place them all in the same folder on your computer so that you can easily keep track of which images you are working with.
Check Your File Sizes
Either during the download process or after you have downloaded your image to your local computer, you will want to check the size of the image file.
In Finder, navigate to your image file. Right-click (mouse) or two-finger click (trackpad) on the image. Click Get Info to open an information pop-up. In the pop-up, you should see the file size in bytes and KB or MB under General > File Size.
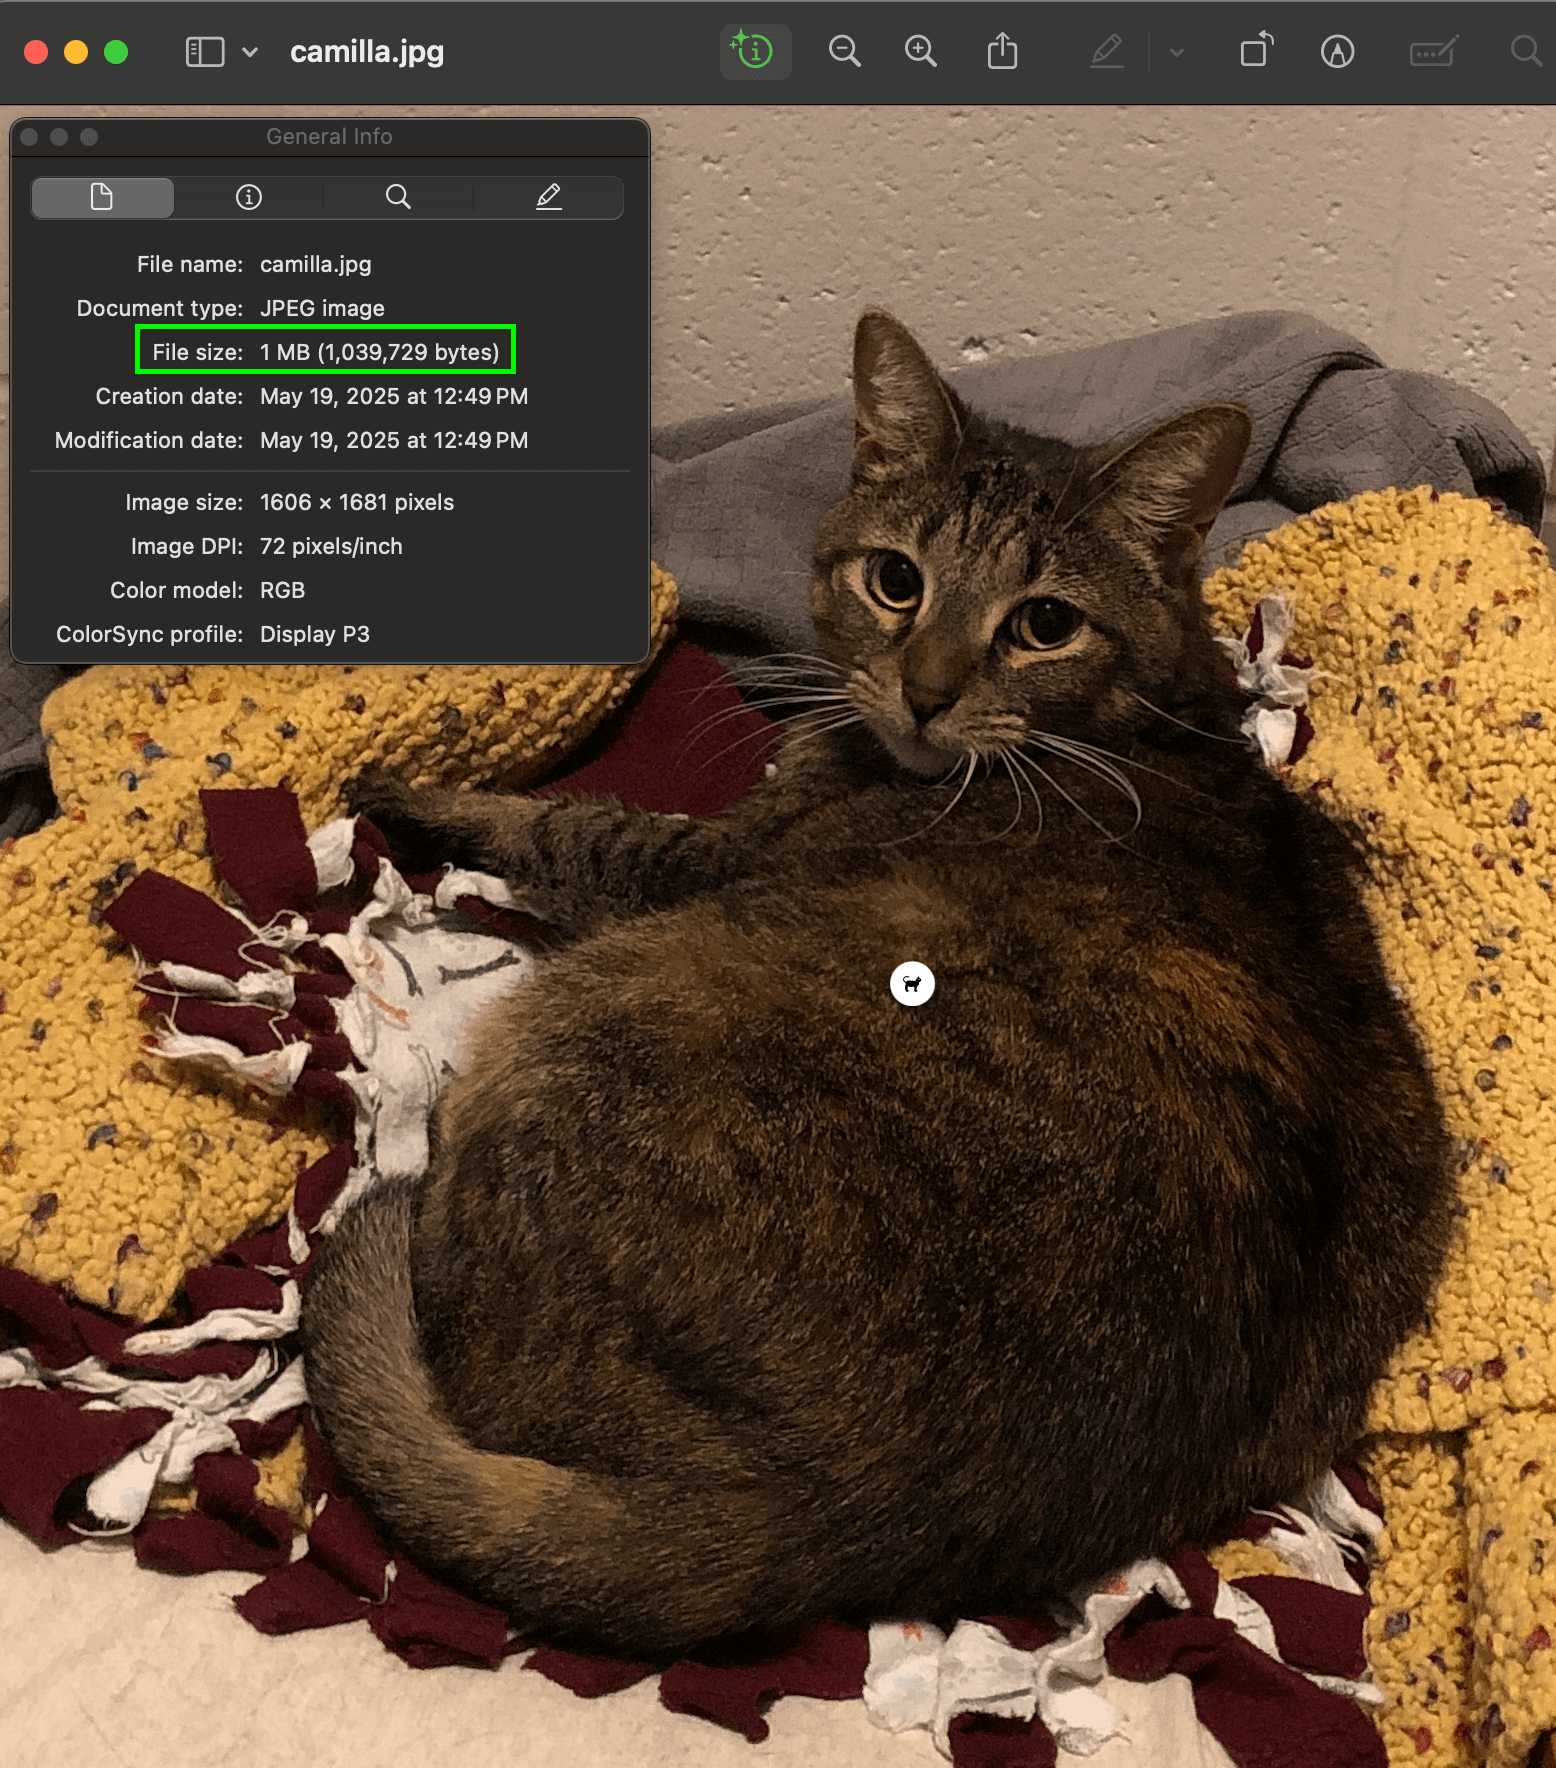
Figure 1. General Information about an image file’s technical specifications in macOS Finder.
Resize Your Images
If your image file size is over 100 MB, you will need to resize it before uploading it to IIIF Workbench. If not, you can skip this step.
Open the image in Preview. In the Mac menu bar at the top of the screen, choose File > Export. Select PNG, TIFF, or JPEG. Move the scroller so that the file size displayed is under 100 MB, but as close to lossless as possible.
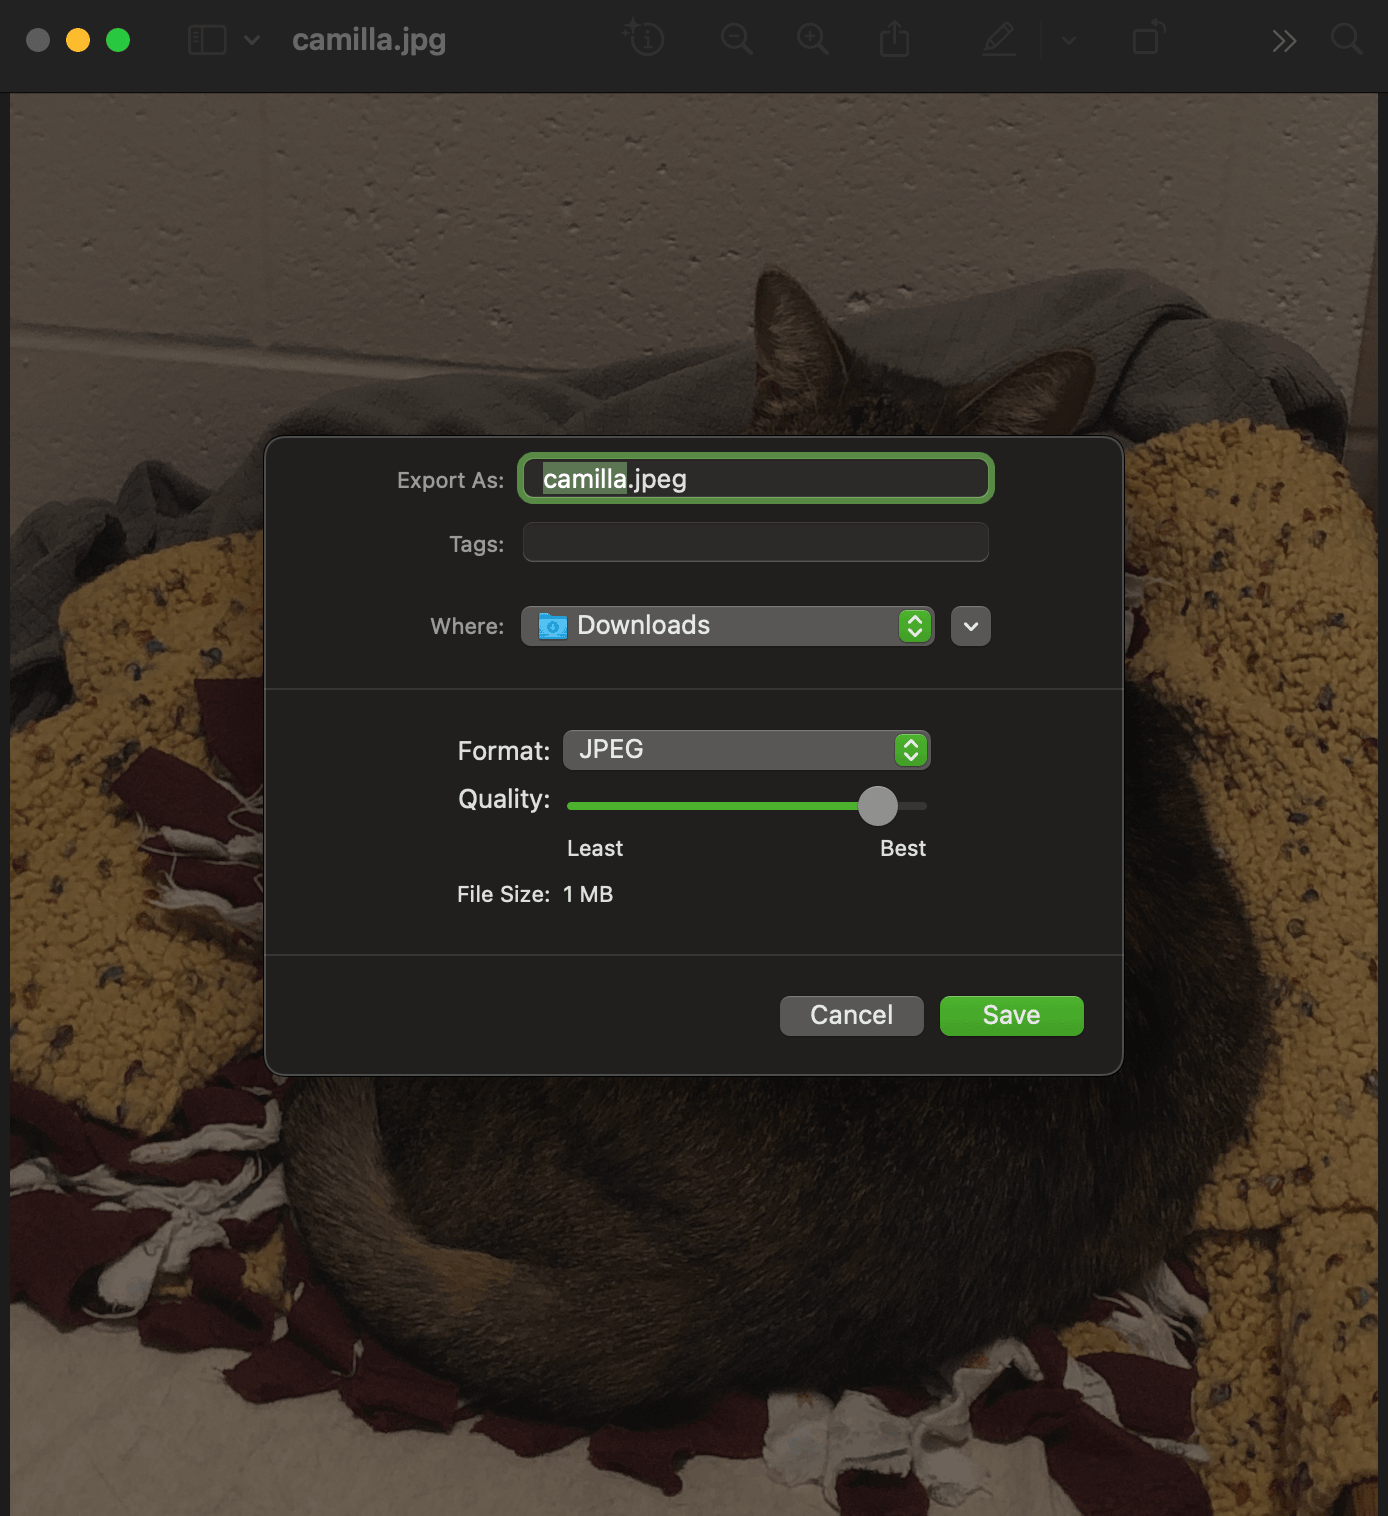
Figure 2. The editor for resizing images in macOS Preview.
Using IIIF Workbench
Start a IIIF Workbench Project
To access IIIF Workbench, login to your GitHub account in a web browser. You will need to give the IIIF Workbench access to your account’s public repositories in order to create a new repository with your processed image files.
Once you have logged in, you can access the IIIF Workbench in a web browser. You will want to either select an existing project or create a new one. Each project is a separate repository in your GitHub account. The title you give a project in IIIF Workbench, will be the title of that image file repository in your GitHub account.
Upload Your Images
Once you have created your project, upload your images one by one. IIIF Workbench does not allow batch uploads, so you will need to select each image file individually.
You will be prompted to select an IIIF Image Version, either IIIF v2 (2.x) or v3 (3.x). See the What is the Difference Between IIIF Versions? section above for guidance.
Your image may take a while to process. IIIF Workbench must process the image file, generate tiles, upload to GitHub, and publish to the web. You can view the progress at the bottom of the image box. While you wait, you may navigate to other pages but do not close the Workbench tab.
When image processing is complete, you should see a thumbnail version appear in a box in IIIF Workbench. The image filename will appear underneath, along with a link to an info.json file. The info.json is a JavaScript Object Notation (JSON) file that contains the information needed for the IIIF APIs to process and serve the IIIF image to the web. The box for each image in IIIF Workbench will also display a hyperlink to the hosted image in your GitHub repository. You can view all downloaded image files in your project GitHub repository as well.
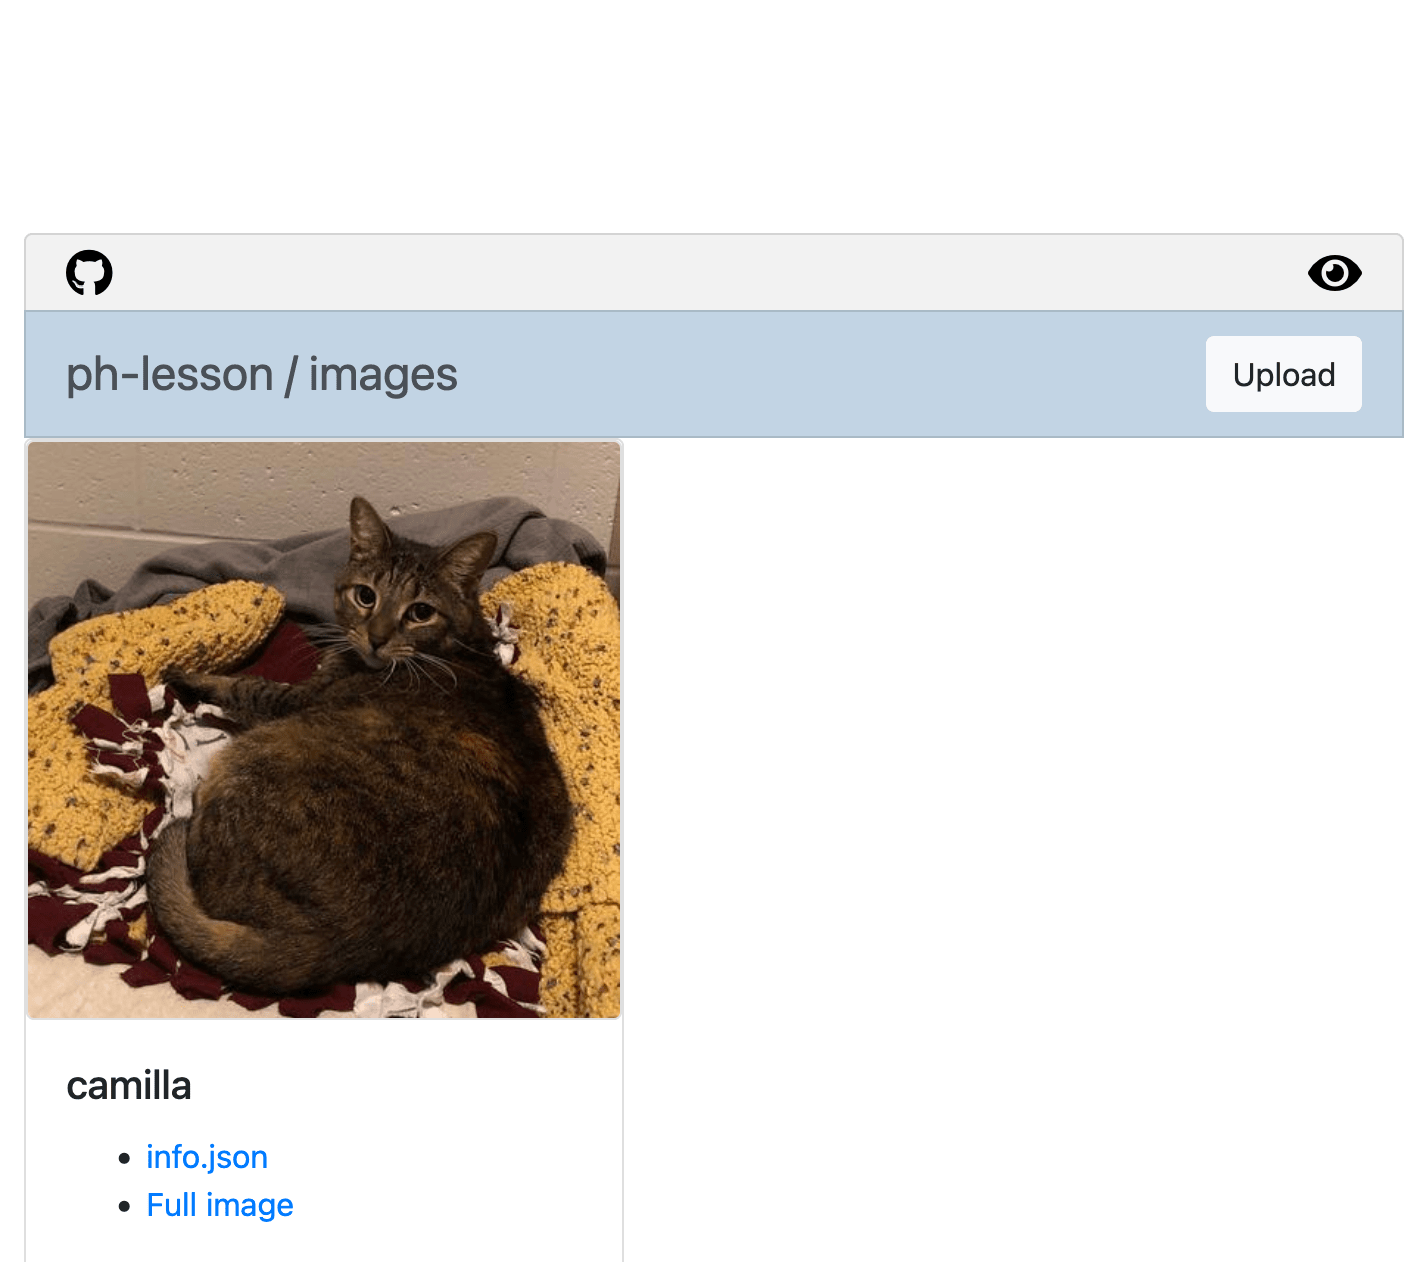
Figure 3. The resulting processed image in the IIIF Workbench. The info.json link is the info.json URI and the Full image link is the image URI.
Find the Identifiers for Your Image
In IIIF Workbench, both of the identifiers are listed under the title of an image. To use the info.json URI, click on the info.json hyperlink under your image. Copy the URI in the search bar. This is your image’s info.json URI. To get the image API URI, click on the full image hyperlink under your image. Copy the text in the search bar. This text is your image’s image API URI.
At this stage, you can go to the Creating Manifests section to create manifest files, either manually or using a manifest editor.
Method 3: libvips and GitHub.com
Overview
Method 3 uses libvips, an image-processing library, instead of IIIF Tiler to create Level-0 IIIF-compliant image tiles. It then uses GitHub to host those images and present them using the IIIF Presentation API through GitHub Pages.
libvips gives you significant control over the specifications for a single image, including tile overlap, tile size, depth, angle, and more. libvips creates Deep Zoom (DZI) tile pyramids for your images, so that only the area of the image that is viewed in a particular zoom is loaded. For this reason, libvips tends to create more tiles for an image than IIIF Tiler. The increased number of tiles can be difficult to upload, but the images tend to be of slightly higher quality and more zoomable.
Installations
Method 3 requires installation of the following software packages:
Homebrew is a package manager that makes installing software easier and safer. Package managers are helpful because they identify, check for, and install dependencies or softwares required for another piece of software to run, allow you to update software in a single command, and ensure that the software you are downloading has been vetted. Keeping your software updated also avoids security vulnerabilities. Package managers download software into discrete locations on your system, avoiding conflicts with existing files and structures of your operating system. They also allow you to upgrade or uninstall software in bulk using a single command.
When downloading software from the web, be sure to only click on official links from the developer (such as the hyperlinks included above). Make sure to check any relevant installation instructions for your operating system (Windows, Mac, or Linux), and to download the appropriate file.
Every installation for this method can be done on macOS using Homebrew.
Preparing Your Image Directory and Files
Using the command line or your operating system’s file management application (Finder, File Explorer, etc.), create a directory for your image file somewhere on your local computer. Name your directory as you please. This lesson will refer to the image file directory as iiif-libvips.
Download your image to the iiif-libvips directory. As with the other methods, if you have the option, download your image using the optimal file format available. For creating high-quality IIIF-compliant images, TIFFs are best, JPGs/JPEGs are second best, and PNGs are third best.
Using libvips to Tile an Image
The libvips pyramid constructor operates entirely in the command line using a set of arguments that specify filename, format, properties, and more. A full set of arguments available for the deep zoom pyramids command, are listed in the libvips documentation.
For this lesson, you will use the deep zoom command, saving the tiled files in a IIIF-compatible layout within a folder.
Open the command line on your local computer and change directories to your iiif-libvips directory. Run the following command: vips dzsave YOUR-IMAGE-NAME --layout iiif3 YOUR-PREFERRED-FILENAME.zip. vips is the libvips command. The dzsave argument specifies the desired format for the image as a deep zoom file. The --layout iiif3 argument specifies the arrangement of the tile files in the folder that make up the composite image, which will be IIIF v3-compliant. The zip extension specifies that the files should all be packaged together into one neat, compressed file package for easy access.
Wait for the ZIP file to appear in the iiif-libvips directory. When you open the ZIP file, you will find folders containing the various tile files that make up the IIIF image and an info.json for each image. Each of the individual image folders make up a Level-0 compliant IIIF image.
Before continuing, be sure to open the ZIP file for each image so you can access the contents.
Batch Tiling Images
If you want to use libvips to tile multiple image files, you will need to use scripting language in the command line to identify all the files in a directory, batch them by name or file extension, and run the same command on all of them. In the bash command line, for example, you could run: for filename in *.jpg; do vips dzsave "$filename" "$(basename "$filename" .jpg)-pyr" --layout iiif3; done. Since this process is different on each operating system and can vary depending on scripting language, this lesson will not include step-by-step details for batch tiling with libvips. For Windows, see Steve Jansen’s Guide to Windows Batch Scripting. For Mac and Linux, see John Cupitt’s bash solution on the libvips GitHub Issues.
Create Your Image and Manifest Repository
Now that you have all of these image tiles, what do you do with them? To store, host, access, and share your images, you can create a basic GitHub repository.
First create a new repository on GitHub. Next, create an images folder. While in the images folder, upload all of the individual image folders (e.g., image-1, image-2) in the iiif-libvips directory on your local computer. You may have to do this in batches due to GitHub’s upload limits. You can delete the vips-properties.xml file.
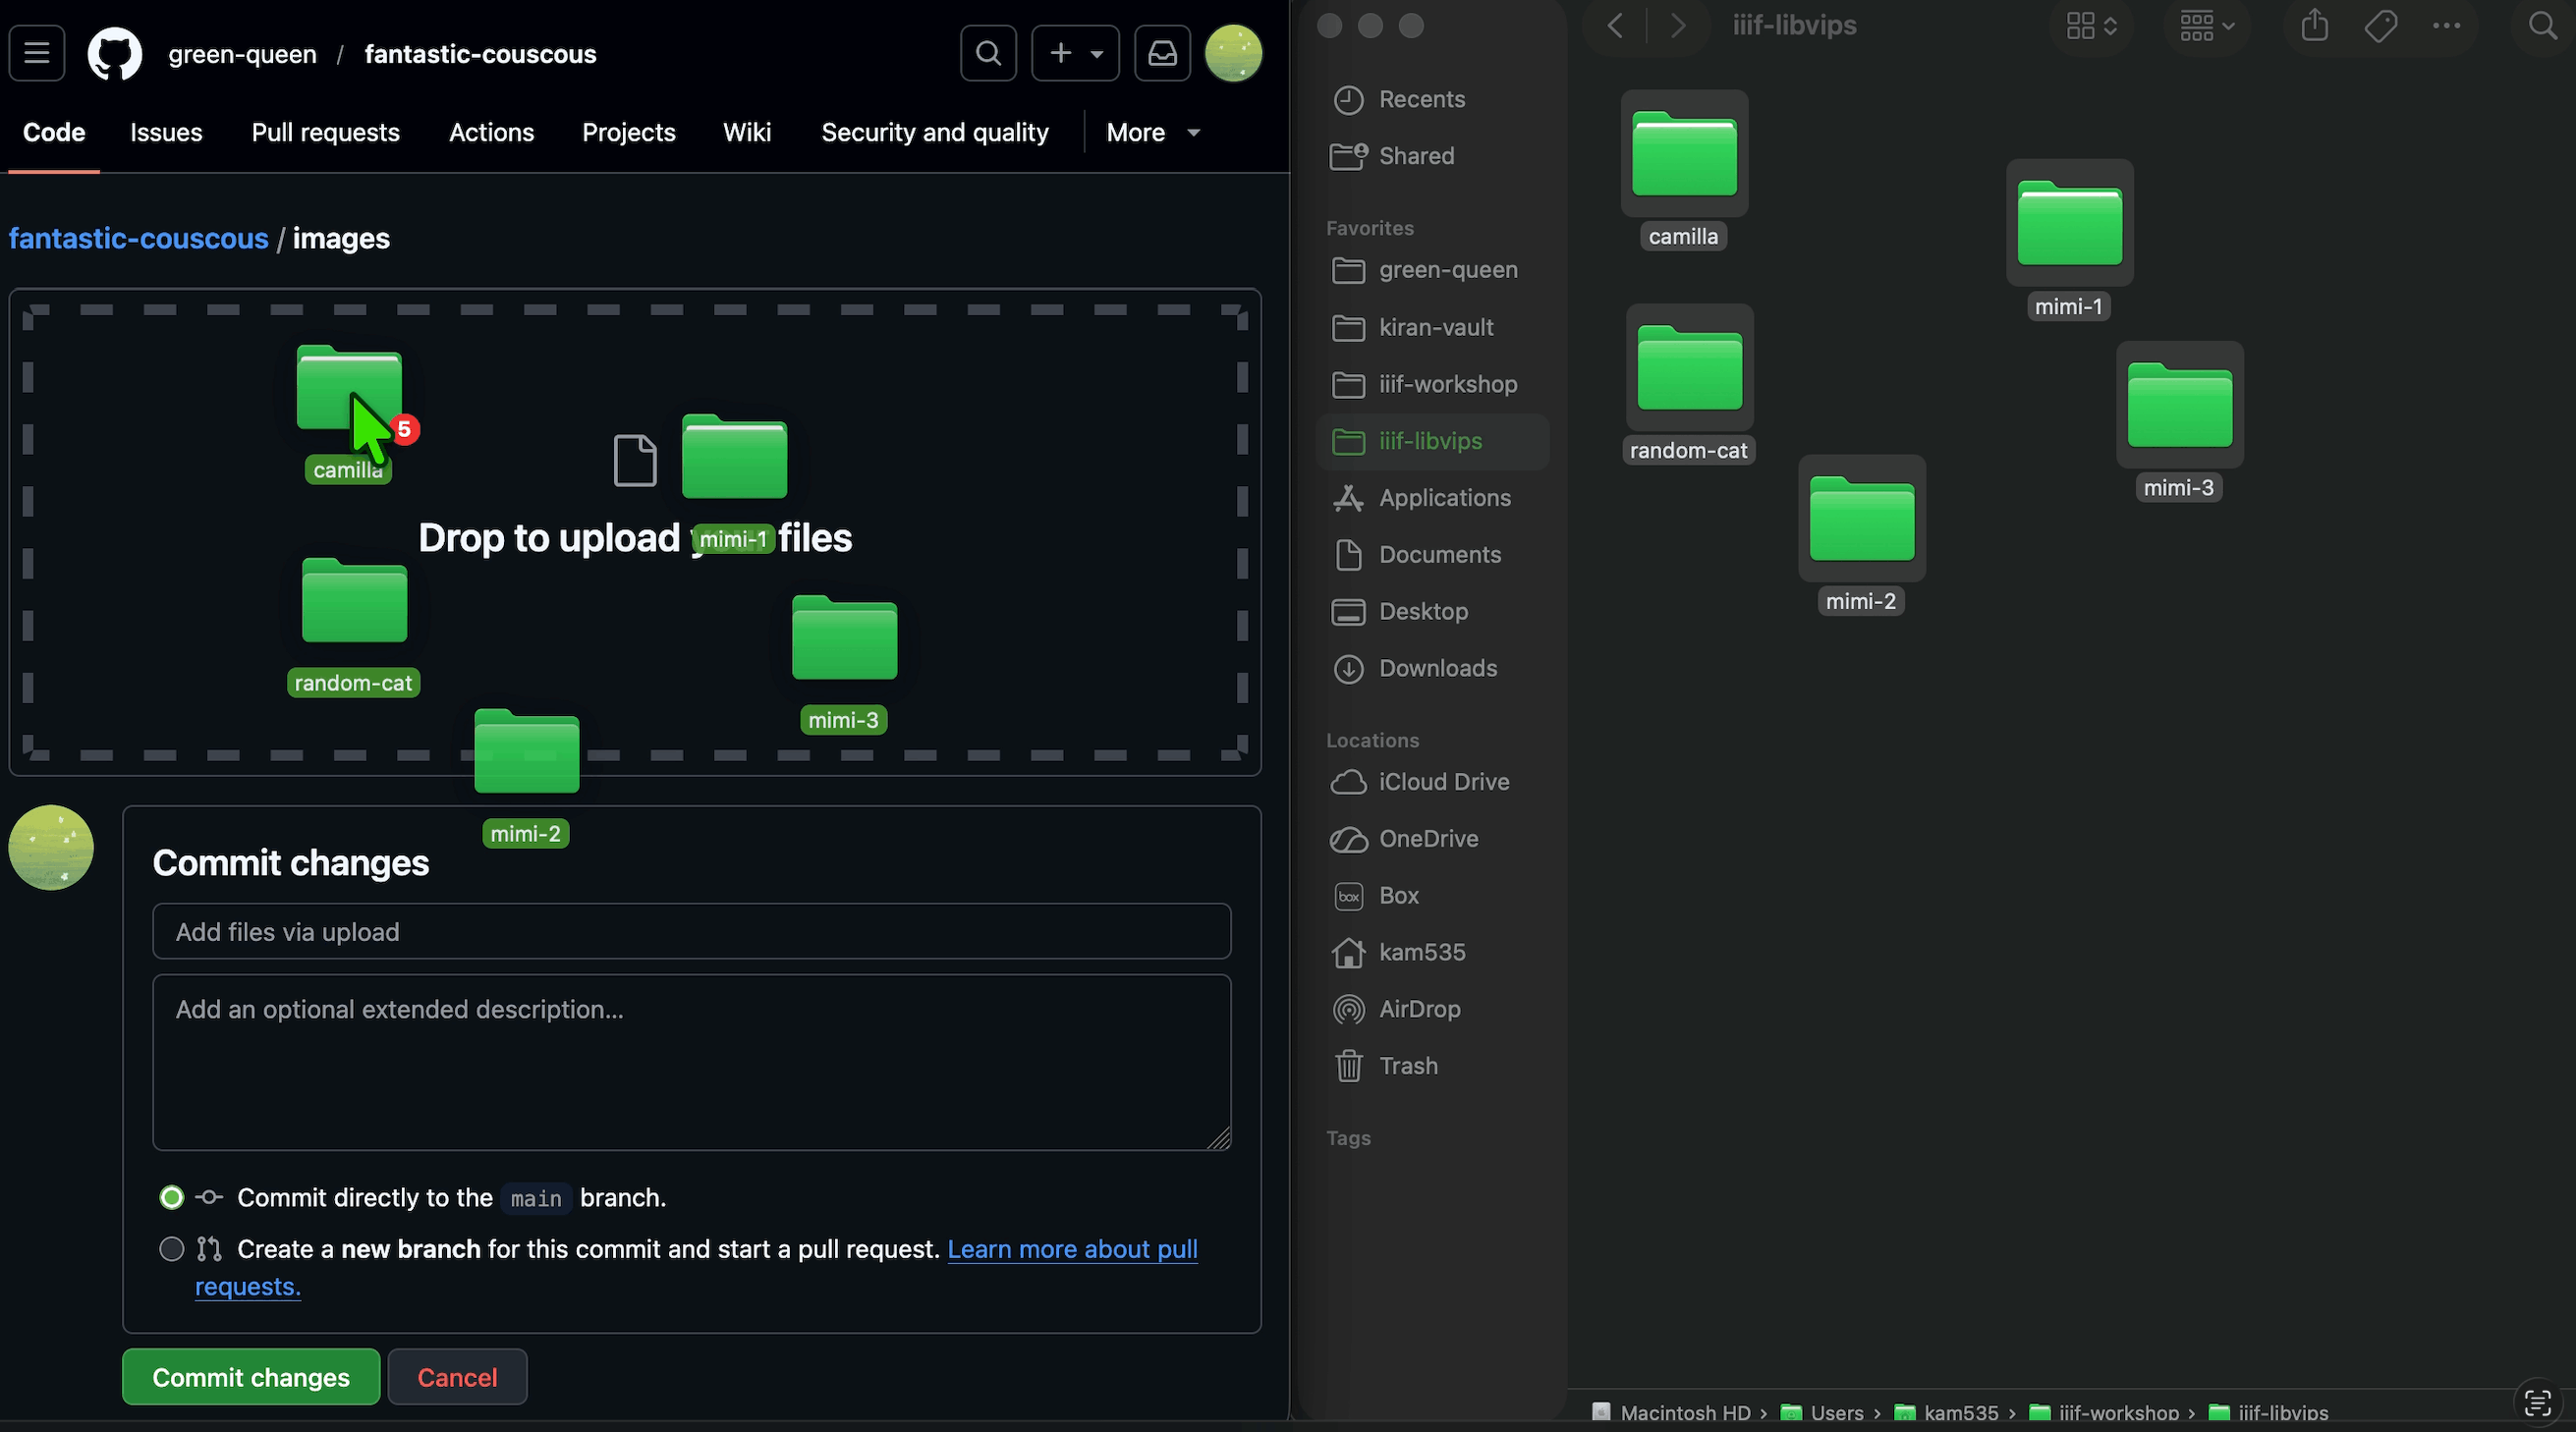
Figure 4. Dragging image tile files from a local computer to upload to the images folder in a GitHub repository.
Create a manifests folder in the same repository. You will use this folder later to store and host your manifests.
In your repository, go to Settings > GitHub Pages. Set the Source to ‘Deploy from a branch’ and the Branch to ‘main /(root)’.
Clean Up Your Image Files
Because you are using your local computer, libvips will populate info.json files for your images with your local server address as the reference. For your images to be properly displayed, they need to reference the server they are actually located on.
After all files have uploaded successfully to GitHub, open the info.json file for each image and update the first @id field (v2) or id field (v3) to: https://YOUR-GITHUB-USERNAME.github.io/YOUR-REPO-NAME/images/YOUR-IMAGE-NAME.
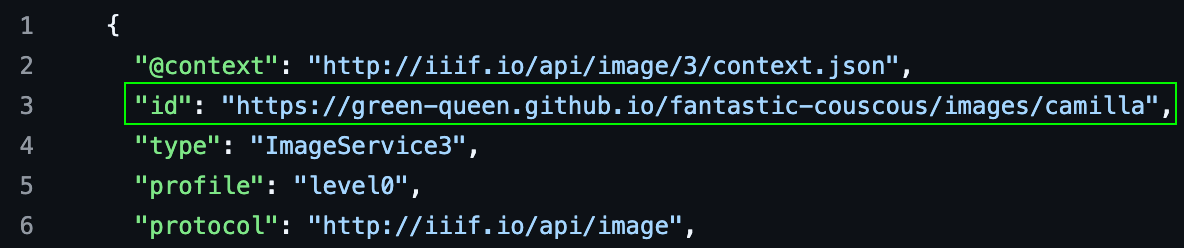
Figure 5. The updated image URI in an info.json file for an uploaded IIIF image processed using libvips.
Find the Identifiers for Your Image
The identifiers for your image will be constructed from your newly edited info.json files and the public link to your image through GitHub Pages. See the What is a IIIF Manifest? section for details on the identifier structure.
At this stage, you can go to the Creating Manifests section to create manifest files manually or using a manifest editor.
Creating Manifests
Now that you have your images prepared and have their identifiers on hand, it is time to create your manifests.
To create a manifest from your image, you can either use a manifest editor or create the file manually. Using a manifest editor allows you to edit your manifest using a Graphical User Interface (GUI) which displays options as buttons instead of writing code from scratch. The former is easier for learners with no/limited programming knowledge, while the latter allows for more careful control of the manifest file.
Note that for Method 2, IIIF Workbench does not create individual manifests for each image. Instead, it creates one manifest for all uploaded images. This works well if you would like to display all of your images as pages within a IIIF viewer. However, if you want each image to have its own manifest so that you can use each image separately, you will have to create individual manifests for each of your images, as with Methods 1 and 3.
Using a Template
To write the most basic manifest from scratch in IIIF version 3, the following components are required:
@context: the URL for the presentation API version you’re using. For IIIF v3, it would be ‘http://iiif.io/api/presentation/3/context.json’.idfor every object: the unique URL to the canvas, item, annotation page, annotation, etc.typefor every object: the type of resource that the object contains, such as a canvas, item, annotation page.label: a unique label for each object, such as ‘canvas 1’, ‘rights’, ‘a picture of my mom’.
You will also need to include at least one canvas and one item each with the AnnotationPage and Annotation type.
id field should include the basic URL to your image. For tiled images (Methods 2 and 3), your last id field should include the image API URI.
To create a manifest file, open a program like TextEdit and create a new file. Save the file with the extension .json. Using the following template, replacing the placeholder text with your information as follows:
{
  "@context": "http://iiif.io/api/presentation/3/context.json",
  "id": "https://YOUR-GITHUB-USERNAME.github.io/YOUR-REPO-NAME/manifests/YOUR-MANIFEST-FILENAME.json",
  "type": "Manifest",
  "label": {
    "en": [
      "YOUR MANIFEST LABEL"
    ]
  },
  "items": [
    {
			"id": "https://YOUR-GITHUB-USERNAME.github.io/YOUR-REPO-NAME/canvas/YOUR-CANVAS-ID",
      "type": "Canvas",
      "height": YOUR IMAGE HEIGHT,
      "width": YOUR IMAGE WIDTH,
      "label": {
        "en": [
          "YOUR CANVAS LABEL"
        ]
      },
      "items": [
        {
          "id": "https://YOUR-GITHUB-USERNAME.github.io/YOUR-REPO-NAME/canvas/YOUR-CANVAS-ID/annotation-page/YOUR-ANNOTATION-PAGE-ID",
          "type": "AnnotationPage",
          "items": [
            {
              "id": "https://YOUR-GITHUB-USERNAME.github.io/YOUR-REPO-NAME/annotation/YOUR-ANNOTATION-ID",
              "type": "Annotation",
              "motivation": "painting",
              "target": "https://YOUR-GITHUB-USERNAME.github.io/YOUR-REPO-NAME/canvas/YOUR-CANVAS-ID",
              "body": {
                "id": "YOUR IMAGE URL OR IMAGE API URI",
                "type": "Image",
                "format": "image/jpeg",
                "height": YOUR IMAGE HEIGHT,
                "width": YOUR IMAGE WIDTH
              }
            }
          ]
        }
      ]
    }
  ]
}
Here is a completed example for a manifest with an image of my cat:
{
  "@context": "http://iiif.io/api/presentation/3/context.json",
  "id": "https://green-queen.github.io/fantastic-couscous/manifests/my-cat-mimi.json",
  "type": "Manifest",
  "label": {
    "en": [
      "My Cat Mimi"
    ]
  },
  "items": [
    {
      "id": "https://green-queen.github.io/fantastic-couscous/canvas/cat1",
      "type": "Canvas",
      "height": 1024,
      "width": 720,
      "label": {
        "en": [
          "canvas 1"
        ]
      },
      "items": [
        {
          "id": "https://green-queen.github.io/fantastic-couscous/canvas/cat1/annotation-page/p1",
          "type": "AnnotationPage",
          "items": [
            {
              "id": "https://green-queen.github.io/fantastic-couscous/annotation/mimi",
              "type": "Annotation",
              "motivation": "painting",
              "target": "https://green-queen.github.io/fantastic-couscous/canvas/cat1",
              "body": {
                "id": "https://green-queen.github.io/fantastic-couscous/images/camilla.jpeg",
                "type": "Image",
                "format": "image/jpeg",
                "height": 1024,
                "width": 720
              }
            }
          ]
        }
      ]
    }
  ]
}
Using a Manifest Editor
Feeling daunted by manual editing? There are plenty of web-based manifest editing tools you could use instead. Each manifest editor has its own instructions, so make sure to read the relevant documentation. For the Bodleian Manifest Editor, the documentation on their GitHub repository includes a demo, while the Digirati Manifest Editor documentation includes a full user guide.
To add your image to a manifest, open a manifest editor such as the Digirati Manifest Editor and create a new project. Add your static image (Method 1) by selecting the Image from URL option, or add a IIIF Image API URI (Methods 2 and 3) using the IIIF Image service option. Add an image to the canvas metadata using the info.json URI or image API URI. The image should populate on the canvas.
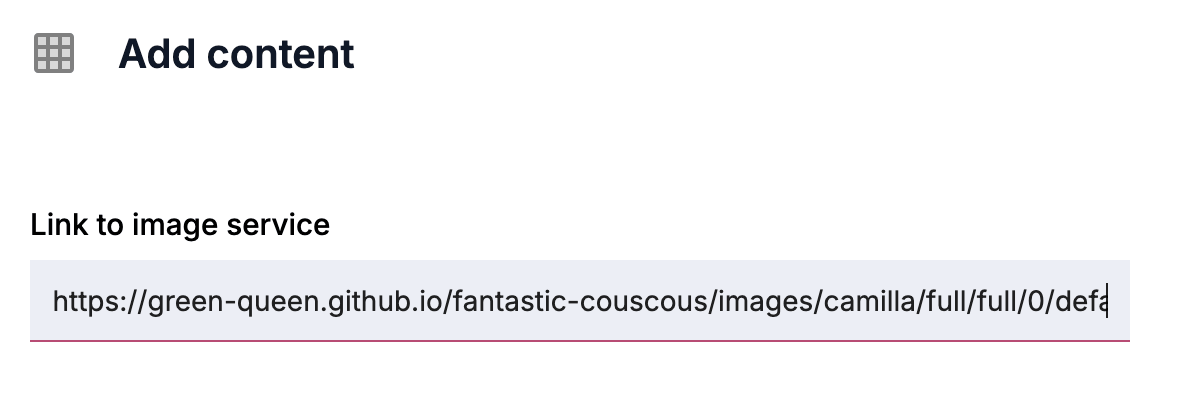
Figure 6. The interface to add an image with the image URI or info.json URI to a manifest in Digirati’s Manifest Editor.
Once you have added your image, it is best to add metadata to your canvas and manifest using the pre-populated fields. Metadata allows other viewers to understand what your image shows and what data it contains. Of particular importance is the license (v2) or rights (v3) field, which lets viewers know where you found the image, who owns it, and the licence under which it is shared, such as a Creative Commons license or a RightsStatements.org URI. This metadata can help other users to determine whether they can use the image in their own projects, and if so, under what conditions.
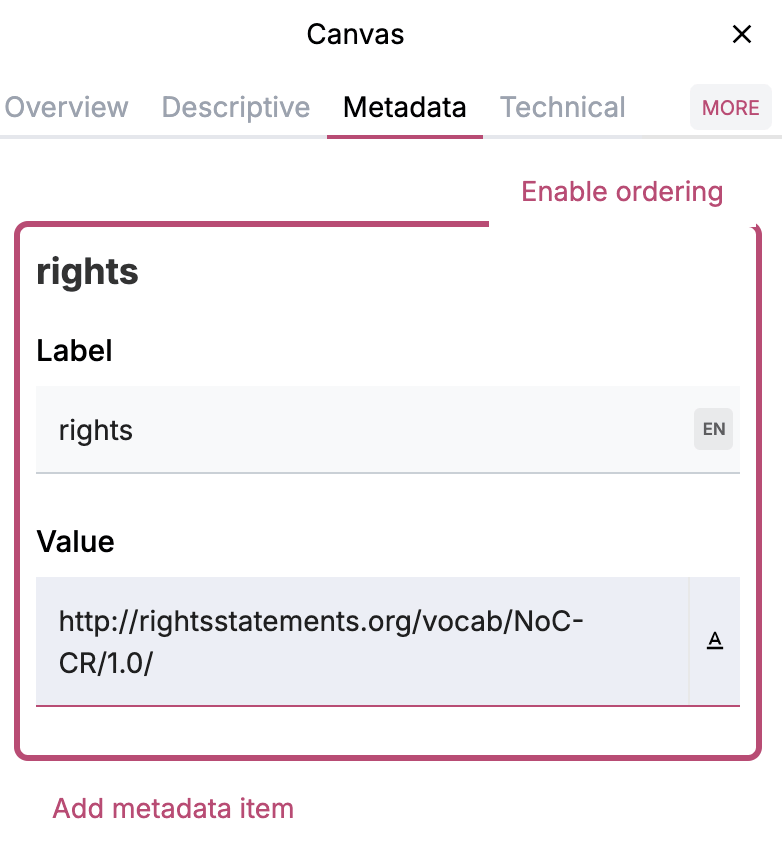
Figure 7. The interface to add metadata fields, including rights metadata, to a manifest canvas in the Digirati Manifest Editor.
When you are finished, save your manifest, give the file a unique title, and download it to your local computer. Note that it is easiest to name your manifest file the same thing as the corresponding image file, so that you know at a glance which image the manifest displays.
Storing and Hosting Manifests
Now that you have your manifests, you also need to host them, just as you host your images.
If using Method 2, IIIF Workbench automatically uses GitHub pages to serve your project to the web. In the top menu in IIIF Workbench, navigate to Manifests. Upload a manifest by selecting the manifest file from your local computer. The manifest will upload into your GitHub repository for the project. When completed, you will see a list of your manifests in IIIF Workbench that can be edited, downloaded, deleted, or viewed in Mirador or Univeral Viewer from the Workbench.
In IIIF Workbench, you can access manifest URIs by clicking on the IIIF logo next to your manifest and copying the URI in the search bar. The manifest URI will always end in .json. You can also see and download your manifest files in the corresponding folder in your project GitHub repository.
If you are using Methods 1 or 3, you will need to upload your manifests manually. To do so, open the manifests folder in your GitHub repository and upload all of your downloaded manifests. Open each manifest file to correct the @id(v2) or id (v3) in line 3 so that it reads: https://YOUR-GITHUB-USERNAME.github.io/YOUR-REPO-NAME/manifests/YOUR-MANIFEST-NAME.json.

Figure 8. The updated manifest URI in a manifest JSON file processed using Digirati’s Manifest Editor.
Using Your Manifests
Congratulations! You now have some fresh manifests which you can use to serve some cool images with IIIF. Now let’s take them for a spin.
In order to make sure your manifests are displaying as expected, try testing them out in various viewers. IIIF maintains a list of compatible viewers for each version. To test your manifest, you will need the manifest URI.
The manifest URI is the unique identifier for a manifest. You can find the manifest URI by opening your manifest JSON file and copying the content in the @id (v2) or id (v3) field. This is the manifest URI.
Some options for IIIF viewers include: Theseus, Mirador, Univeral Viewer, and Clover. Simply paste the manifest URI into the viewer to test your manifest.
Conclusion
IIIF is a great framework for publishing, displaying, sharing, and reusing images, with support for high-quality presentation and deep zooming. In this lesson, you learned how to create a usable, reusable IIIF manifest from a downloaded image. You also learned about:
- IIIF, IIIF manifests, and Level 0 IIIF compliance.
- Choosing a method for creating Level 0 IIIF-compliant images and manifests based on your skills and priorities.
- Processing IIIF-compliant, web-hosted images from downloaded image files using IIIF Workbench.
- Editing IIIF image files and manifest files using GitHub.
- Creating IIIF-compatible image tiles from downloaded image files using the
libvipscommand-line tool. - Finding, accessing, and editing image and manifest URIs.
- Hosting and accessing IIIF images and manifests with GitHub Pages.
- Loading, viewing, sharing, and zooming in on IIIF images with manifest editors and IIIF viewers.
Now that you’ve reached the end of this lesson, you should have at least one IIIF image URI and one IIIF manifest URI that you can plug into different projects and viewers and share with others as a high-quality, zoomable presentation version of your original downloaded image. Need inspiration for using your new manifest? Try creating an exhibit or digital narrative using Exhibit.so or Storiiies.
For more tools and resources, see the community-built Awesome IIIF GitHub repository.
Endnotes
-
International Image Interoperability Framework, Home, accessed August 5, 2026, https://iiif.io/. ↩